Watch all my videos on Product Tank TV

Receive an email update when Product Tank launches a new project

Powered by Squarespace

A product design blog containing unique observations, advice and ideas to improve objects from the mind of Product Tank.

 You can subscribe to receive my future blog posts by email, each time I publish new content - just click on the orange RSS symbol (on the right) and you will be taken to feedburner.

Entries in model making (18)

Tuesday
Jan272015

Camera Crane Dimensions

I have had a few requests for plans to make my Go-Pro Camera Crane.  So here are a few images with simple dimensions:

The thicknesses are determined by what plywood you can source and the thicknesses of the Aluminium tubes. Thickness is also determined by the type of bearing you source.  I've used inline skate bearings bought from Amazon for a very reasonable price.  They are countersunk into the plywood and accept an 8mm dia steel rod well.  To anyone hoping to build one of these, I wish you success. PT

Sunday
Aug102014

Product design is in me

I've just finished and uploaded my youtube channel trailer, that shows via plasticine model (so its not conclusive) that once cut in half, product design is in me.  Funnily enough it was almost curtains for me whilst making this trailer, because the red paint I'd mixed up to replicate blood sprayed everywhere, miraculously missing the brand new carpet that had just been laid.  Had it hit the carpet, I might not be here to blog again, or would definitely have seen if my innards spelt product design.  Fortunately, no guts need to be spilled, it was a remarkable escape.

I haven't posted for a while, because I've had bad computer problems that I am pleased to say (touch wood) have now been fixed.  So I'd like to say a lot more stuff is on it's way, but as I've posted before, good things take time and even then, they may not be that good.  

Sunday
Jun012014

split cane

I've been building a splitcane fishing rod or rather restoring an old rod I bought from Ebay (the handle is made from recycled cork salvaged from some rather enjoyable bottles of wine I have consumed over the last twelve months) it's been an interesting little project.  These days there is a clamour for new, lighter materials - carbon fibre IM6 etc, but there is something magical about six pieces of bamboo, flamed, split and shaped into triangular sections that are glued and bound so they are heaxagonal in section.  I find the material fantastic to use and look at.  We are constantly striving to make better materials with improved properties, which I'm in favour of, but there is something about many man made materials and I can't explain why, but they lack warmth. 

Sunday
May112014

GoPro Camera crane

I have been working on a camera crane for a GoPro camera to improve the quality of my video's.  So this video shows the outcome of a 2 day design and build.  If you can't see the video, please either click on the Tank TV widget on the side of my website or go here: Ultimate DIY GoPro Camera Crane

Sunday
May112014

Wheel Barrow video

My wheelbarrow video is finished  If you can't see this video on your tablet, please click here WheelBarrow video:

Saturday
Mar292014

sneak peek - wheel barrow

It's almost finished, except for a few more images and a short video to edit and upload.
Saturday
Jan252014

Pike lures

Over Christmas I had a go at making a pike lure or two, as its a bit of wood whittling you can do in front of the fire on a cold winter evening whilst with friends and family (it beats being out on your own in a cold shed!).   The ones I made are each about four inches long.  Fishermen use them to immitate bait fish or annoy the pike into lunging at them.  After the first, I got into the shaping and hand painting so made several more. They probably won't catch any fish (the images show them without their hooks fitted which I have yet to do), but it did make me think a lot about future design projects and surface decoration.


Sunday
Jan192014

Camera slider


Christmas and New Year have gone and whilst I had a lot of fun, it's now back to the (literal) drawing board. I've been pottering about on a few projects for friends and I've also had one eye on the future. So to the future:
One of my latest jobs was to make myself a camera slider to (hopefully) improve the professionalism of my video's. I decided to drive my slider with an electric screwdriver, which currently are rediculously cheap, the one shown was £10. The rails are made from square aluminium tube from the local hardware store.  Professionally made ones are very expensive, but its such a simple device and there are lots of Youtube tutorials, so if you are into your film making, I recommend you have a go at making one and save a lot of money. 
I've also been working on a range of tables, but I'm not sure whether they will see the light of day as currently they won't work unless I find a way of defying physics and gravity.   I'm also working on another lamp and I have to finish of my wheelbarrow!
If anyone asks me 'What's the future?' It's Momo's, little indian snacks that are absolutely magic with a cold beer.  You can find the recipe in Rick Steins Indian book.  They must be made with the hot chilli dip he also recommends.  One of the best things I ate over Christmas - and I ate a lot!
Monday
Dec162013

make models

I see lots of student work which looks amazing, but I know cannot be manufactured.  The problem is a lack of time or care, where the designer has not made a model to test their idea (maybe a model is not part of the grade criteria).  I want to address this, because I am noticing this trend increasing.  So I thought about making an instructional video for students.  Then I heard the Baz Luhrmann sunscreen song and wanted to use it as the inspiration and the idea went from there. Please watch the video.

The narration:

> Students of product design - make models.
> I have seen hundreds of portfolios, where students have been too quick to use CAD without first testing their ideas to see if they will work.
> The long term benefits of making models to quickly identify and solve problems has been proven by product designers over and over again. The rest of my advice is purely opinion. I will deliver this advice with a large nod to Baz Luhrmann, now.
> Design is a journey, when you begin a project you should not know what the end destination looks like. Do not be in a rush to get to the final solution. Get lost, go down many paths and enjoy what you discover.
> Always go too far and then come back.
> Research, know your audience, walk a mile in their shoes and if you can't, try to understand all the nuances surrounding who you are designing for and what you are designing.
> Never stop asking why.
> What ever you design, always try to make it new in some way.
> The brief is king, challenge it, exceed it, but you must answer it.
> CAD is only one tool, currently it cannot tell you how something feels or behaves in your hand or how heavy or uncomfortable it is in use.
> A pretty picture of a design is not a product.
> Take things apart, you cannot hope to improve anything if you don't know how it works. 
> If you take a found object and put a light bulb in it, you are just up-cycling.
> People say you are only as good as your last project, rubbish! You are only as good as your next project because of everything you have learnt. Make lots of mistakes and learn from them.
> No real good has come from forcing anything, take regular breaks. Never think, 'that will do'.
> Don't design to make money, design because you care and trust me about making models.
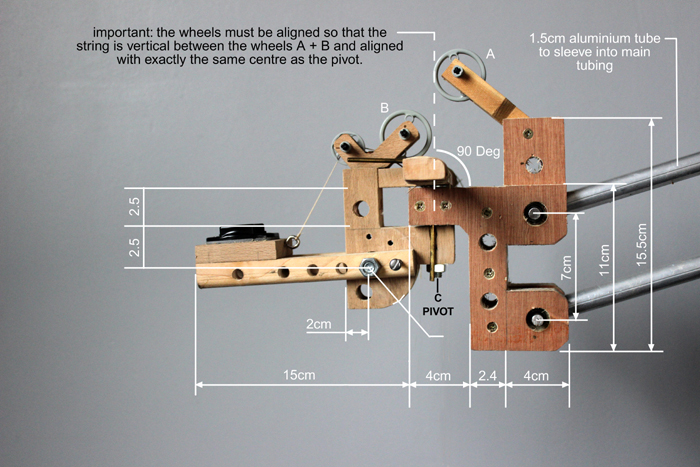
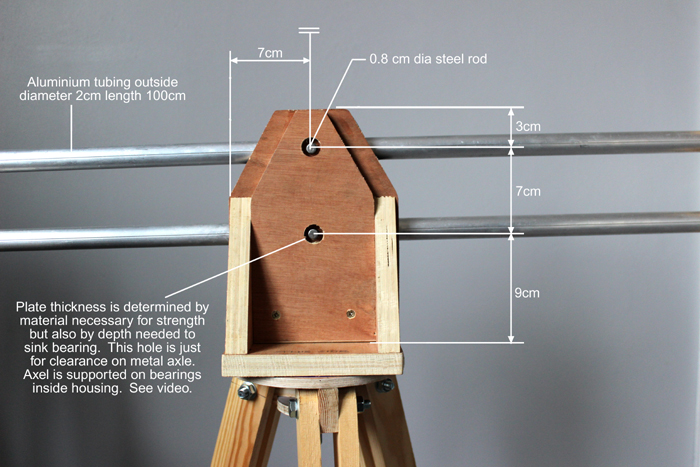
Sunday
Nov102013

Where would I be without carpet tape?

Oh, where would I be without carpet tape.  If you want to make quick models without having to wait for glue to dry, the double sided sticky stuff is invaluable.  I use it on practically every product design project, even if it's just to hold two pieces of wood together whilst I'm cutting them, so I get two of the same shape without having to draw and cut it out twice.  To hold things in place whilst you screw them together or assemble a model, its invaluable.  Easy to use and apply, it sticks like the brown stuff to a bed sheet! I should have shares in it, it's my top model making cheat.  

Thursday
Nov072013

Spray booth

Lots of people assume they need a lot of equipment when model making, but actually you can get by with very little equipment (good power tools are a great help).  When I was in university there was a fantastic spray booth with water wall, turn table and fan system.  But despite the fact that it was a joy to use, the spray results that I acheived are no different to my current high tech system, which is newspaper, two strips of wood to counter wind and an empty bit of space.  A few things to consider though...Try not to spray below about 8 degrees C and ideally spray over 10 degrees C.  Make sure humidity is as low as possible and what you are spraying is dry and even though outdoors, always wear a mask and work out wind direction before you spray to avoid accidents!

Thursday
Oct032013

How to prototype live hinges

Many times I have a design that I want to have a live hinge. The easiest way I have found to prototype live hinges when making working models is to slot thin strips of polypropylene into slots cut into my model.  By drilling holes first, then cutting a slot leading into the hole, I can easily control the depth of the slot and also have a means of pushing the polyprop hinge out if you want to make adjustments. Its important to select the right saw blade thickness to polyprop thickness (I find a junior hacksaw blade works best) and then double the polyprop up.  For added security you can also push pegs into the holes.  In the images of a pan lid locking handle (above) and clothes peg (below) the main material used is beech wood, with pieces of bamboo skewers used to lock the polyprop in place and pull the hinge taught on the clothes peg.

Tuesday
Aug062013

A watch to watch

I have finished my watch project.  I say finished, what I mean is released, because especially now, at launch, I can see lots of things I'd like to tweak, but for now it is done.  It was quite an enjoyable project, I think mainly because (after the car) I was working on something small, but I enjoyed making lots of models and getting back into the design process.  

Recently I've been musing about this.  As a product designer, I think you have to be in love with taking journeys, not necessarily worrying about the end destination.  If you enjoy the journey, where you eventually arrive will be good.  If you only focus on the end destination, not exploring all the avenues and pathways, where you end up will not be as strong, simply because you willl have not travelled as far (and probably taken a few short cuts to get there!).  I'm not saying my watch project is great or I'm at the end of the journey, but I like the analogy.

Saturday
Jul062013

product design ideas - pond filter

I have a small pond that is currently the colour of pea soup and i'd like it to be clear.  I have a UV Light on the pump outlet, but it doesn't seem to be reducing the green (yes I've checked the bulb).  So, this weekend, I decided to go all Heath Robinson on it.  I have a load of stainless steel mesh, left over from other projects (originally my kettle design).  I've used it before to filter bits out of wine, so I thought I'd make a set up to try and take some of the sediment out of the water.  The rig I built works really well for a while, tiny bits ofsediment build up as they hit the mesh and are pushed to the sides by the pressure of the water, but aftter about an hour or so, the build up gets too great and rather than go through the mesh, the water spills over the sides.  So, I've been thinking of improving the design to incorporate a water wheel, driven by the fall of the water to brush the sediment that builds up into a collection area.  This is only the first stage, this is the product design process in action.  I have identified the problem, almost have a working solution, but it still needs the design process to make it into a realistic object.

Sunday
Jun302013

Model making is not really a hobby, more a way of life. I'm always looking for materials to store for future models.  I have boxes and boxes of plastic parts and scraps of material, it becomes habitual to look at everything I am about to put in the bin, just to check if I can't think of what it could be useful for.  So recently I have become very interested (possibly slightly obsessed) with the packaging that comes with raw meat.  The plastic boxes that hold your chicken thighs and wings are full of amazing patterns, useful for all sorts of model details, handgrips, watch straps or if you have kids, making superhero body armour.  The possibilities are endless, (I wish I had found this when I was working on the head lamps for my car) just make sure you wash it thoroughly before re-use!

Sunday
Jun232013

prototyping and model making for product design - book review

I was given the book 'Prototyping and Modelmaking for Product Design' for Christmas.  Since then I've been referring to it.  Many of the processes and techniques I already use on many of my projects, but it is a great resource especially for students or those new to making models for product design. It covers lots of processes many of which i didnt know much about.  I suppose in some respects I wanted to check if the techniques that I've been using could be improved or were out of date as I am quite a traditional model maker, due to the availability of materials and resources, (we'd all like a rapid prototype machine, but one is currently out of my price range).  I have developed lots of techniques to get around not having the right tools, or to do things more cheaply or reuse what I've got.  But for the whole overview, from the professionals, this book is really good.

Tuesday
Jun182013

old skool Design ideas - lamp

When I was in University, during a very short project I designed and made a prototype for a fold up table top lamp body that gripped a bulb and socket.  The design was one piece, made from polypropylene and whilst it looked (in my opinion) quite cool, it was actually fairly unstable and due to the materials and shape, too light weight to be safe.  The reason for posting it here is because it's been sat in a cupboard for about 15 years, but now I need to recycle the materials for another design project I'm currently working on, a series of watches, so just before it is gone forever, sacrificed for the greater model making good, I decided to record it for posterity.

Friday
Feb152013

model making - Bandsaw blues

I have found that whilst making prototypes and testing concepts in my workshop (shed) in certain light conditions with a thin saw blade, it becomes really difficult to see my bandsaw blade accurately.  So in fear of loosing the odd finger I recently, as a simple and very cheap fix, taped a piece of paper to the guard.  I'm also contemplating spraying the circular cover white.  I'm surprized manufacturers don't supply a white version when you buy the saw?  This simple solution appears to do the trick for now.