Watch all my videos on Product Tank TV

Receive an email update when Product Tank launches a new project

Powered by Squarespace

A product design blog containing unique observations, advice and ideas to improve objects from the mind of Product Tank.

 You can subscribe to receive my future blog posts by email, each time I publish new content - just click on the orange RSS symbol (on the right) and you will be taken to feedburner.

Entries in prototype (19)

Tuesday
Jan272015

Camera Crane Dimensions

I have had a few requests for plans to make my Go-Pro Camera Crane.  So here are a few images with simple dimensions:

The thicknesses are determined by what plywood you can source and the thicknesses of the Aluminium tubes. Thickness is also determined by the type of bearing you source.  I've used inline skate bearings bought from Amazon for a very reasonable price.  They are countersunk into the plywood and accept an 8mm dia steel rod well.  To anyone hoping to build one of these, I wish you success. PT

Tuesday
Oct282014

Camera stabiliser for GoPro Camera

I've just completed a DIY tutorial on how to make a camera stabiliser for a GoPro camera for free, using lego, selotape, elastic bands and a sheet of paper.  The idea was that anyone could make this without the use of any tools.  If you want to watch the video, please click - HERE
Sunday
Jun012014

pond filter continued

We are officially in summer and with the warm weather, the perennial problem of pond filtration has once again come to the fore.  Last year I posted a piece on my blog about a prototype I was working on to clear the pea soup pond in my garden to a gin clear beauty.  Following what I learn't last year, I have once again been working on a prototype to solve the problem, so far with limited results.   As I have said before, good things take time, but I wish everything would happen faster.  I guess the older you get the less patience you have and when it comes to having a clear pond my patience is waining but I'm not giving up yet.  More to follow.

Sunday
Jun012014

Camera stabilizer

I've been working on new camera stabilizer, having watched Youtube videos of many DIY versions, I have made my own version of a gimbal (to understand the problem and what many think is the best solution and because it's important to walk a mile in another mans shoes) but I have an idea for a different version, so I've been back to the Lego box to create a quick prototype.  May times people have read my blog and thought it to be quite engineering based, but unless you are taking something that already exists and making it look different, this is how all product design begins.  You have to try things and keep experimenting, playing with ideas until something new suggests itself and in this instance, I find the best way to quickly prototype is with Lego. More to follow.
Sunday
May112014

GoPro Camera crane

I have been working on a camera crane for a GoPro camera to improve the quality of my video's.  So this video shows the outcome of a 2 day design and build.  If you can't see the video, please either click on the Tank TV widget on the side of my website or go here: Ultimate DIY GoPro Camera Crane

Sunday
May112014

Wheel Barrow video

My wheelbarrow video is finished  If you can't see this video on your tablet, please click here WheelBarrow video:

Sunday
Dec082013

chopping board video

I've finally managed to upload the video of my improved chopping board/bowl design.  Its interesting how one idea can spurr another, the design can easily be adapted to become numerous other objects, such as a dust pan or a wheel barrow.  I chose to have a crack at the wheel barrow for my next project, with a sneak peek at the end of the video on progress so far.  Please have a look, I hope you enjoy it.

Tuesday
Aug062013

A watch to watch

I have finished my watch project.  I say finished, what I mean is released, because especially now, at launch, I can see lots of things I'd like to tweak, but for now it is done.  It was quite an enjoyable project, I think mainly because (after the car) I was working on something small, but I enjoyed making lots of models and getting back into the design process.  

Recently I've been musing about this.  As a product designer, I think you have to be in love with taking journeys, not necessarily worrying about the end destination.  If you enjoy the journey, where you eventually arrive will be good.  If you only focus on the end destination, not exploring all the avenues and pathways, where you end up will not be as strong, simply because you willl have not travelled as far (and probably taken a few short cuts to get there!).  I'm not saying my watch project is great or I'm at the end of the journey, but I like the analogy.

Saturday
Jul062013

product design ideas - pond filter

I have a small pond that is currently the colour of pea soup and i'd like it to be clear.  I have a UV Light on the pump outlet, but it doesn't seem to be reducing the green (yes I've checked the bulb).  So, this weekend, I decided to go all Heath Robinson on it.  I have a load of stainless steel mesh, left over from other projects (originally my kettle design).  I've used it before to filter bits out of wine, so I thought I'd make a set up to try and take some of the sediment out of the water.  The rig I built works really well for a while, tiny bits ofsediment build up as they hit the mesh and are pushed to the sides by the pressure of the water, but aftter about an hour or so, the build up gets too great and rather than go through the mesh, the water spills over the sides.  So, I've been thinking of improving the design to incorporate a water wheel, driven by the fall of the water to brush the sediment that builds up into a collection area.  This is only the first stage, this is the product design process in action.  I have identified the problem, almost have a working solution, but it still needs the design process to make it into a realistic object.

Tuesday
Jun182013

old skool Design ideas - lamp

When I was in University, during a very short project I designed and made a prototype for a fold up table top lamp body that gripped a bulb and socket.  The design was one piece, made from polypropylene and whilst it looked (in my opinion) quite cool, it was actually fairly unstable and due to the materials and shape, too light weight to be safe.  The reason for posting it here is because it's been sat in a cupboard for about 15 years, but now I need to recycle the materials for another design project I'm currently working on, a series of watches, so just before it is gone forever, sacrificed for the greater model making good, I decided to record it for posterity.

Sunday
Apr212013

Car design finally...

This weekend I finally completed the car project I have been working on for... too long.  Its been a difficult project (every thing that could have gone wrong did), so I'm not sure how I feel about the end result - if I had to do it all over again... I'd probably walk away.  Of course there are loads of things I'd like to have done a lot better and things I'd completely change.  As usually happens half way through this project, I came up with a much better idea for another car, its a real humdinger in the sketch pad.  Unfortunately it was such a radical change that I couldn't incorporate it into this design.  So I was faced with the tricky descision of scrapping several months work or pushing on.  Much squinting and tongue chewing later, I decided to push on and so now, at the end, I'm glad I did - although this could be the wine talking! 

All I have to do is polish a few images, edit a video and release it on the web to begin its new life on its own (fly my pretty).  I have learnt a lot whilst doing this project that I am sure will benefit me in the future, especially techniques for covering things in paper, which is a great for quickly covering over unsightly mistakes - it feels like the motto of this project should be, if it's unfinished, glue some paper over it and it will (hopefully) be ok.  Other mottos would also include, don't try and make round things without a lathe, dont decide it would be fun to make the interior as well as the exterior and do decide how the doors are going to open at the start, rather than thinking 'Oh I'll resolve that minor detail later on'. Yee Haa
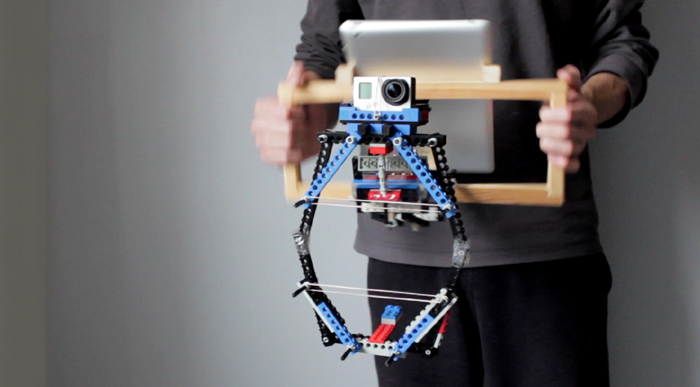
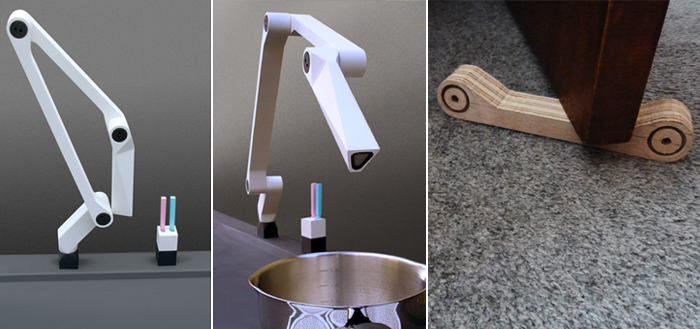
 

Sunday
Feb032013

design hack

I don't know if it's because of the bitterly cold weather we've been having (see previous post), but my bandsaw blades keep breaking.  Rather than throw them out, I decided to recycle broken blades into wood rasps. I initially wanted to fix cut lenghths together with nuts and bolts, but the tempered blades whilst easy to saw, proved impossible to drill through.  Instead I taped all the pieces together and cut a 'V' in each end (with a dremel and grinding wheel) to then hold in a frame.

I also positioned the teeth in opposite directions so I cut material when working the rasp in both directions.  The blades are spaced apart because the teeth of the blades are angled, so with coarse toothed blades, this gives a better cut, but with fine toothed blades this isn't necessary as my second experiment proved.  I am very pleased with the results, they work as well as my current wood working rasp and save me throwing the blades away.

As fine toothed blades don't need to be spaced apart, the ends can just as easily be wrapped in strong tape and then covered with filler or Sugru to make them comfortable to hold.

Thursday
Dec272012

design ideas - chocolate

A while ago I made a series of vac forming moulds to make my own chocolates.  They were going to be unique flavours and shapes, with popping candy in the tips of one idea.  I found the moulds whilst rummaging for some parts over christmas and it seemed relevant as recently I've eaten a lot of chocolate.  Looking at the moulds now, it's surprising how architectural they are, even though that wasn't the original intention.


Tuesday
Dec112012

design ideas - door stopped

I never really said why my doorstop was different, so I made a short explanation video.

Sunday
Dec022012

design ideas - Pepper fox

I'm working on a series of designs that use animal iconography.  The pepper fox model above was a very quick exploration of form using a cheap bit of pine.  It needs a lot of refinement, but I've designed a nice grinding mechanism driven by squeezing the tail to the body that allows it to be used one handed and the ears allow you to unscrew a lid for re-filling. I'm also working on a rabbit jug and swan decanter.

Tuesday
Nov272012

design ideas - Door stop

A while ago I designed and built a model kitchen with an extendable 'reach over' tap.  Initially I made the tap arms too small and had to make them again, but one of the waste parts somehow ended up as my door stop.  Since then it's been very useful, working so well I'm considering making more for the other doors in the house.

Monday
Nov262012

design ideas - Flooding #2

Alas, the rain continues.... and combined with the wind direction, rain is being blown onto the back door of the house.  This has meant that every time I open the door to go out to my shed to make a model or two, water runs off the door and drips off it's end scribing a perfect arc onto the floor inside.  It's becoming annoying.  I can't believe that door manufacturers haven't come up with a nice cosmetic way to gutter the water off the door to prevent this, which would be an additional USP and could easily be provided as an additional option. 

5 minutes with photoshop provided me with a design solution, a gutter that runs along and extends beyond the edge of the door when open.  I'll admit my modification is not that beautiful (if I spent more time on it I could make it amazing), but even like this, it's better than having to continually lay and change newspaper every time it rains.

Saturday
May162009

design idea - chopper the knife

Its personal preference, but if I could just use one knife for food preparation, then it would have to be a cleaver for functionality.  However, I find a serrated blade as well as a sharp edge useful. 

The problem with combining both cutting edges on a knife is that it can make the knife difficult to sharpen.

The quick design I came up with is to put the serrated blade on an angle, so that you can get the best of both worlds, having the straight blade closest to the handle for fast cutting control.

Just a thought.

Thursday
Jan152009

design idea - Salt n pepper

I’ve been thinking about products that could be emailed to a customer, rather than transported physically. In the same way that data is sent to a manufacturer who imputs it into a computer that cuts a tool, that makes a product.

I’ve heard that in the future every home will have a rapid prototyping tool, in a similar way to the Star-Trek replicater. My thought was, what if every home with a printer already had the beginnings of that tool, what could I design that could be downloaded then printed out and easily made.

My first design idea (simple, practical, with no moving parts) is a salt and pepper pot. I’ve been experimenting with various designs and having made several prototypes have come up with two interesting shapes that can be constructed from a sheet of A4 paper.